
Product quality inconsistent? Struggling with tricky viscosity measurements? Using a rotational viscometer correctly is easier than you think, ensuring accurate results every time.
To use a rotational viscometer, select the right spindle and speed, immerse it in your sample, and record the torque reading. Proper setup and calibration are key for accuracy.
At Martests, we understand that precision and branding matter. I've been with the company for a while now, and we have over 20 years of experience serving professionals like Jacky from Italy. We offer high-quality, customizable rotational viscometers.
These instruments combine accuracy with private-label flexibility. This makes them ideal for global distributors who need reliable, factory-direct solutions from our base in China. Learning to use these instruments properly is the first step. It helps you unlock their full potential. It also ensures your customers receive consistently excellent products. So, let's dive into how to use these essential tools.
What Are the Main Parts of a Rotational Viscometer?
Confused by all the components of your viscometer? Want to understand how each part contributes to an accurate reading? Knowing your instrument is the first step.
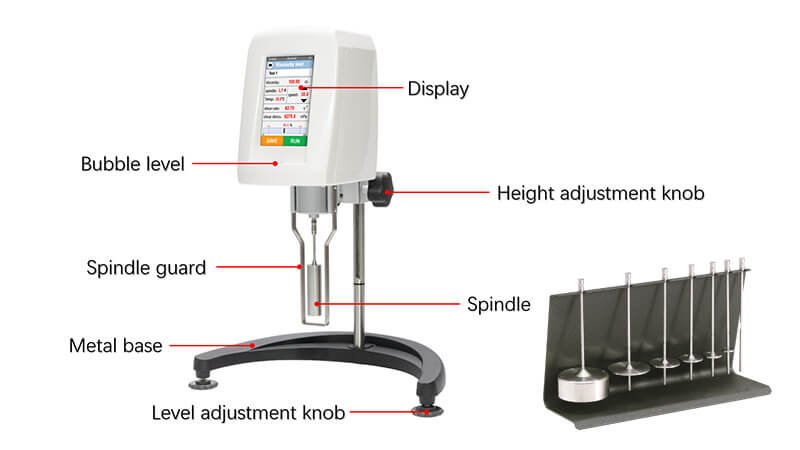
A rotational viscometer typically includes a motor, a drive shaft, various spindles, a display, a stand, and a leveling system. Each part plays a crucial role in measurement.
Understanding the components of your rotational viscometer helps you use it more effectively and troubleshoot any issues. At Martests, we ensure each part of our viscometers is top quality. This is something our distributors, from Europe to South America, really appreciate. Let's break down the main parts:
Key Components and Their Functions
| Part | Function | My Insight |
|---|---|---|
| Motor & Drive Unit | Provides the rotational force to turn the spindle at a precise, selected speed. | This is the engine of the viscometer. Consistent speed is vital for accurate readings. |
| Spindles | Interchangeable measuring elements of different shapes and sizes. They are immersed in the test fluid. | We offer a range of spindles because different fluids require different geometries for optimal measurement. |
| Torque Sensor | Measures the resistance the fluid exerts against the rotating spindle. This resistance is the viscosity. | A sensitive and accurate torque sensor is critical. It's what converts physical resistance into data. |
| Display & Controls | Shows readings like viscosity, torque, speed, and spindle number. Allows users to set parameters. | Modern digital displays make it easy to see results and set up tests quickly. |
| Stand & Leveling | Supports the viscometer and ensures it is perfectly level. | A level instrument is non-negotiable. If it's tilted, the spindle won't rotate true, skewing results. |
| Guard Leg | Protects the spindle and can influence flow patterns, sometimes required for specific spindle types. | Often overlooked, but it can be important for consistent readings, especially with low-viscosity fluids. |
Knowing these parts helps you understand the whole process. It makes you more confident when you use the instrument.
How Do You Set Up a Rotational Viscometer Correctly?
Getting inaccurate readings from your viscometer? Worried your setup might be wrong? Proper setup is simple but essential for reliable viscosity measurements every time.
Correct setup involves leveling the viscometer, selecting the appropriate spindle and speed based on your sample's expected viscosity, and ensuring the spindle is properly attached and immersed.
I often tell customers like Jacky, who value quality and competitive prices, that correct setup is half the battle won. Even the best viscometer, like those we manufacture at Martests, will give poor results if not set up right. It doesn't take long, but it makes all the difference.
Essential Setup Steps
- Find a Good Spot: Place the viscometer on a sturdy, level bench. Make sure it's away from vibrations, drafts, and big temperature changes. These can mess with your readings. I remember a client in Southeast Asia whose readings were all over the place. It turned out their viscometer was next to a large centrifuge, causing vibrations.
- Level the Instrument: Most viscometers have a bubble level. Adjust the leveling feet on the stand until the bubble is centered. This is super important for the spindle to rotate correctly.
- Attach the Spindle: Choose the right spindle for your sample's likely viscosity. Screw it onto the viscometer's shaft carefully. Don't force it or bend the shaft. Make sure it's finger-tight.
- Prepare Your Sample: Ensure your sample is at the correct test temperature. Viscosity changes a lot with temperature. Make sure there are no air bubbles. Use the right amount of sample in a suitable container. The spindle needs to be immersed to the correct depth, usually marked on the spindle shaft.
- Position the Sample: Raise the viscometer head or lower the stand so the spindle is immersed in the sample to the immersion groove. If your viscometer has a guard leg, attach it.
Taking these few minutes for setup ensures your Martests viscometer gives you the top-quality results it's designed for.
How Do You Calibrate a Rotational Viscometer?
Doubting your viscometer's accuracy? Concerned about inconsistent results? Regular calibration ensures your instrument provides trustworthy data for quality control and research.
Calibrate your rotational viscometer using certified viscosity standard fluids. Compare the viscometer's reading to the standard fluid's known viscosity and adjust if necessary, or note the deviation.
Calibration is something we emphasize at Martests. As a factory with two production lines, we know the importance of verified accuracy. Our customers, especially distributors who put their own logo on our products, need to trust the measurements. Jacky, for example, relies on calibrated instruments to assure his Italian customers of product consistency.
Calibration Pointers
- Why Calibrate? Over time, all instruments can drift. Calibration checks and corrects this. It ensures your measurements are accurate and traceable.
- When to Calibrate?
- Follow a regular schedule (e.g., monthly, quarterly).
- If the viscometer has been moved or serviced.
- If you suspect readings are off.
- Before critical measurements.
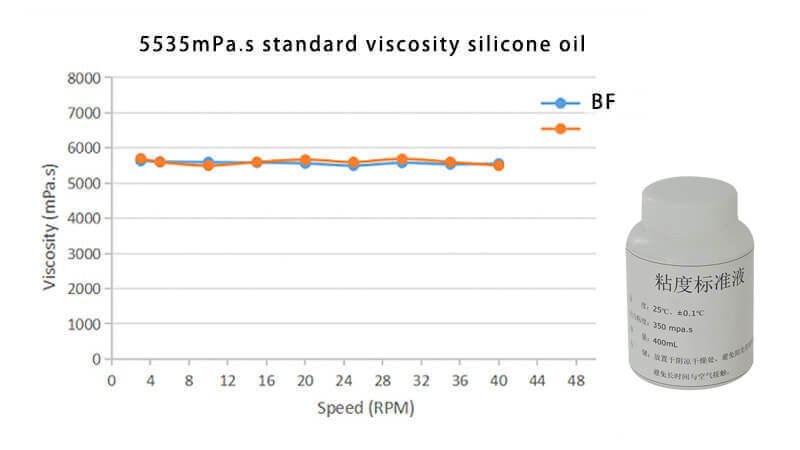
- What You Need: Certified viscosity standard fluids. These fluids have a known viscosity at a specific temperature. You'll also need a calibrated thermometer and a water bath for temperature control if your viscometer doesn't have it.
- Basic Calibration Steps:
- Select a standard fluid with a viscosity close to your typical samples.
- Bring the standard fluid and spindle to the temperature specified for the standard (e.g., 25°C).
- Set up the viscometer with the correct spindle and speed as recommended for that standard.
- Take several readings.
- Compare the average reading to the certified viscosity of the standard fluid.
- If there's a significant difference, your viscometer may need adjustment or service. Some viscometers allow for user calibration adjustments. Always follow the manufacturer's instructions. If you are one of our Martests customers, you can always reach out to us at stefan.wang@martests.com for support.
Regular calibration is a small investment that pays off in reliable data.
What Are the Step-by-Step Instructions for Using a Rotational Viscometer?
Ready to measure viscosity but unsure of the exact steps? Want a clear, simple guide? Follow these instructions for reliable results with your rotational viscometer.
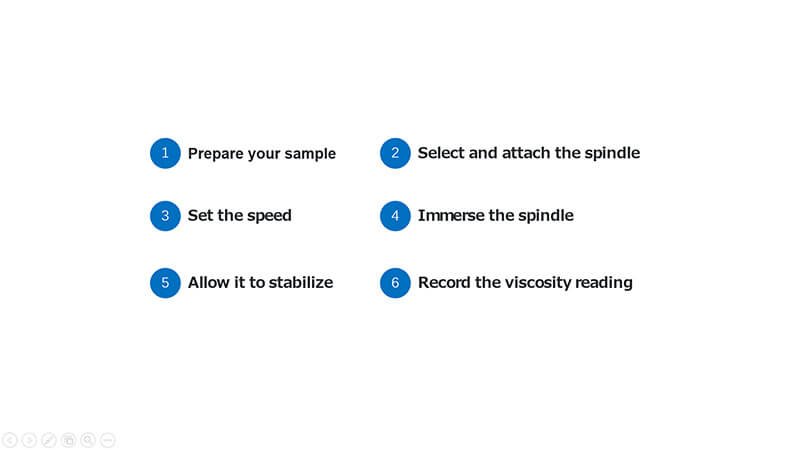
To use a rotational viscometer: prepare your sample, select and attach the spindle, set the speed, immerse the spindle, allow it to stabilize, and then record the viscosity reading.
Using a rotational viscometer is straightforward once you know the steps. I've walked many clients through this, from large distributors in Europe to specialized dealers in the Middle East. Here's a general guide that applies to most rotational viscometers, including our Martests models:
Operational Checklist
- Prepare Sample: Ensure your sample is at the desired, stable temperature. Make sure it's homogenous and free of air bubbles. Pour it into an appropriate container (usually a low-form Griffin beaker).
- Set Up Viscometer: Turn on the instrument. Ensure it's level.
- Select & Attach Spindle: Choose a spindle appropriate for the expected viscosity. If unsure, start with a higher number spindle (for lower viscosities) or a lower number spindle (for higher viscosities). Attach it carefully.
- Select Speed: Choose an initial speed. The goal is to get a torque reading (often shown as % on the display) ideally between 10% and 90-95%. If torque is too low, decrease spindle size or increase speed. If too high, increase spindle size or decrease speed.
- Immerse Spindle: Lower the viscometer head to immerse the spindle in the sample up to the marked immersion groove. If using a guard leg, ensure it's in place.
- Allow for Equilibration: Let the spindle rotate in the sample for a period (e.g., 30 seconds to a few minutes) to allow the reading to stabilize. This ensures the sample's flow behavior and temperature are consistent.
- Take Reading: Once the reading is stable, record the viscosity value. Also note the spindle number, speed (RPM), torque percentage, and sample temperature.
- Clean Up: Raise the viscometer head. Remove the spindle and clean it thoroughly immediately. Clean the sample container. Proper cleaning prevents cross-contamination and damage.
I remember helping Jacky's team train new staff. We created a simple checklist like this, and it really helped them get consistent results quickly.
What Are Common Mistakes to Avoid When Using a Viscometer?
Getting frustratingly inconsistent viscosity readings? Worried you're making common errors? Avoiding these pitfalls will significantly improve your measurement accuracy and save you time.
Common mistakes include using the wrong spindle/speed, improper sample handling (like air bubbles or incorrect temperature), an unlevel instrument, or infrequent calibration. Avoiding these is key.

Over my years with Martests, helping customers across Europe, Southeast Asia, and beyond, I've seen a few common mistakes. The good news is they are easy to avoid once you know what to look for. Our goal is for you to get top quality, reliable data from our rotational viscometers.
Pitfalls and How to Sidestep Them
| Mistake | Consequence | How to Avoid |
|---|---|---|
| Wrong Spindle/Speed Combination | Torque reading too high (>95%) or too low (<10%). Inaccurate viscosity. | Consult tables or experiment. Aim for mid-range torque. Adjust speed or spindle size. |
| Incorrect Sample Temperature | Viscosity is highly temperature-dependent. Readings will be wrong. | Use a temperature bath or controlled environment. Measure sample temperature accurately. Wait for it to stabilize. |
| Air Bubbles in Sample | Spindle encounters air, not just liquid. Erratic readings. | Pour sample slowly down the side of the beaker. Allow sample to sit. Gently tap to release bubbles. |
| Instrument Not Level | Spindle wobbles, incorrect friction. Inaccurate torque. | Always check the bubble level before use. Adjust leveling feet. |
| Insufficient Sample/Improper Immersion | Spindle not fully wetted or too close to container walls/bottom. Skewed flow. | Use recommended sample volume. Immerse spindle to the mark. Use appropriate sized beaker (e.g., 600mL low-form Griffin beaker). |
| Reading Too Soon | Sample flow and temperature not stable. Drifting readings. | Allow sufficient time for the reading to stabilize before recording. This varies by sample. |
| Poor Cleaning | Dried residue affects next sample. Spindle damage. | Clean spindles and containers immediately and thoroughly after each use with appropriate solvents. |
| Skipping Calibration | Instrument accuracy drifts over time. Unreliable data. | Implement a regular calibration schedule using certified standards. Verify performance. |
Avoiding these common issues is crucial. It ensures that when you, as a purchasing manager or distributor, provide products or data, you can be confident in their quality. This is especially true for customers like Jacky who use our Martests viscometers for products they rebrand.
Conclusion
Mastering your rotational viscometer ensures accurate, repeatable results. Proper setup, operation, and avoiding common mistakes are key to reliable fluid analysis for better product quality.